
Hey everyone, welcome to my kitchen!
Today, we’re going to make one of my all-time favorite dishes, something that tastes like the heart and soul of Mexico: gorditas. I had my first real gordita from a street cart in Mexico City years ago, and my life was never the same. Seriously.
The name literally means “little fat ones,” and I promise, it’s a term of endearment! They’re these wonderful little corn cakes—thick, soft, and puffy, with a perfectly crisp outside. You slice them open, and they have this perfect little pocket just waiting to be stuffed with all sorts of delicious things.
Gorditas are the ultimate Mexican comfort food. What makes them so special is how simple they are. At their core, they’re just a celebration of corn.
This recipe is all about that pure, traditional approach. We’re going to focus on creating the perfect masa shell. That glorious, golden pouch is the star of the show. Forget complicated steps. This is about getting your hands a little messy and making something truly special.
So, roll up your sleeves, turn on some music, and let’s get started. I’ll be here to guide you through it.
Recipe Overview: All You Need to Know
Before we start mixing, let’s get a quick look at our game plan. Knowing the what, when, and how makes everything feel easier.
Time Commitment:
The good news? This is a wonderfully quick recipe. You’re not going to be stuck in the kitchen all day.
- Prep time: about 20 minutes
- Cooking time: about 24 minutes
In under an hour, you’ll have a fresh, hot batch of gorditas ready to go. Perfect for a weeknight.
Servings & Scaling:
This recipe makes 6 generous gorditas, which is great for 2-3 people. The best part is how easy it is to change.
- Feeding a crowd? Just double the ingredients.
- Cooking for one? Halve it!
Here’s a handy table to make it easy:
| Servings | Masa Harina | Salt | Baking Powder | Water (approx.) |
| 3 Gorditas | 1 cup | ¼ tsp | ½ tsp | ⅞ cup |
| 6 Gorditas | 2 cups | ½ tsp | 1 tsp | 1 ¾ cups |
| 12 Gorditas | 4 cups | 1 tsp | 2 tsp | 3 ½ cups |
A friendly tip: When you’re making the dough, always add the water gradually. Different brands of masa harina can be a little drier or wetter.
Difficulty Level:
I would rate this as super beginner-friendly. Seriously. If you’ve never worked with masa before, this is the perfect way to start. The process is straightforward and very forgiving. If you’ve ever played with Play-Doh, you can make these.
Essential Equipment:
You don’t need a fancy kitchen for this. Here’s the basic gear:
- A large mixing bowl
- A cast-iron skillet or a non-stick griddle
- A spatula
- A plate and plastic wrap or a clean kitchen towel
- A serrated knife for cutting the pocket
And guess what? You don’t need a tortilla press! Many cooks in Mexico don’t even use one for gorditas. Just place your dough ball between two pieces of plastic wrap and press down firmly with a heavy, flat-bottomed plate. Easy.
Make-Ahead & Meal Prep Magic:
Gorditas are a lifesaver for meal prep. You can make the dough and keep it in the fridge for up to 2 days.
Even better, you can cook the shells completely, let them cool, and store them. That way, a delicious meal is just minutes away on a busy night.
The Heart of the Gordita: Understanding Your Ingredients
The magic of real gorditas is in the simple, quality ingredients. Let’s talk about what you’ll need.
Our star player is 2 cups of corn masa harina. This is not the same as cornmeal! Masa harina is made from corn that has been soaked in a special solution. It’s an ancient technique that unlocks nutrients and gives masa its signature earthy flavor and soft texture. You can find it in the international aisle of most grocery stores.
You’ll also need ½ teaspoon of salt for flavor and 1 teaspoon of baking powder. The baking powder is optional, but I find it gives the gorditas just a little extra lift, making them puff up beautifully.
To bring it all together, you’ll need 1 ¾ cups of warm water. Using warm water helps the masa harina hydrate better, which means you get a softer, more manageable dough.
Finally, 1 ½ tablespoons of olive oil will be mixed right into our dough. This adds a bit of fat, which makes the dough more tender. For cooking, you’ll need about ¼ cup of olive oil for frying. For a more traditional and richer flavor, feel free to use lard or even bacon fat instead!

Step-by-Step Method: Let’s Make Some Gorditas!
Alright, are you ready? We’re about to turn these simple ingredients into something amazing.
Stage 1: Creating the Perfect Masa Dough
First things first, let’s make our dough.
In your large bowl, whisk together the masa harina, salt, and the baking powder. This just makes sure everything is evenly distributed.
Now, pour in about half of your warm water. Using your hands is the best way to do this. It lets you feel the dough coming to life. Mix it all together. It will look shaggy and uneven at first. That’s perfectly fine.
Next, drizzle in the 1 ½ tablespoons of olive oil. Continue mixing, and then start adding the rest of the water, a little at a time, until a soft dough forms.
The perfect texture is key here. You’re looking for something that feels like soft, pliable Play-Doh. It should not be sticky, but it shouldn’t be dry and crumbly either. If you press a piece and the edges crack, you need a tiny bit more water.
Once you’re happy with the feel, cover the bowl with plastic wrap. Let the dough rest for 10 minutes. This little nap allows the masa to fully hydrate.
Stage 2: Shaping Your Gorditas
After the dough has rested, it’s time to shape our “little fat ones.”
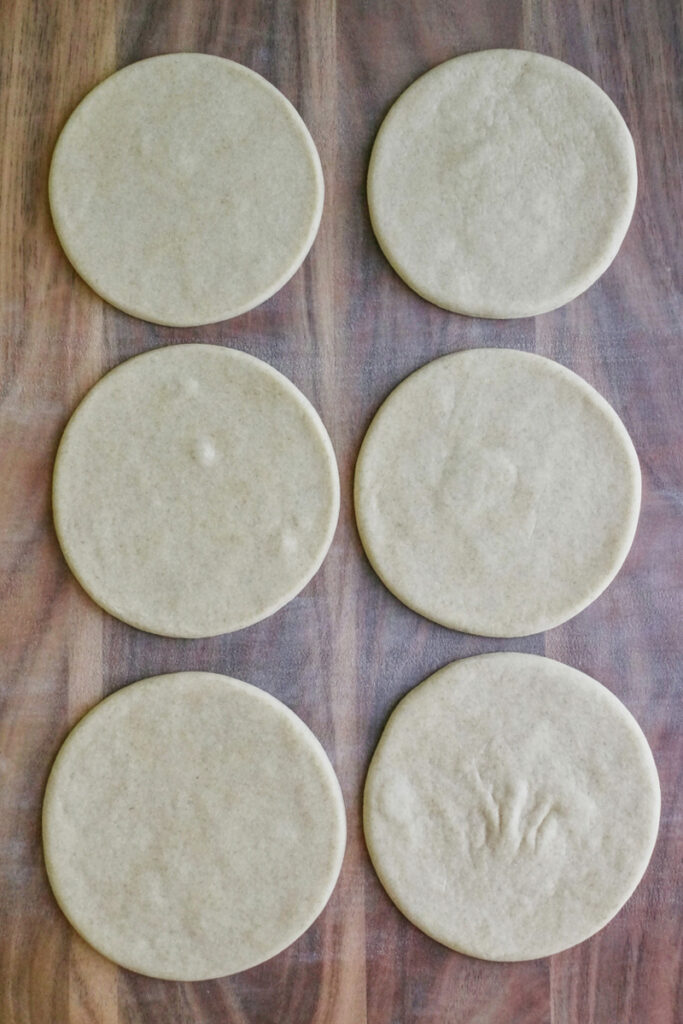
Keep a small bowl of water nearby to dampen your hands. This is the pro secret to keeping the dough from sticking to you! Divide the dough into 6 equal portions and roll each one into a ball.
Now, take one ball and begin to gently pat and flatten it between your palms, rotating as you go. You’re aiming for a disk that’s about 4 inches wide and about ¼-inch thick. You want it to be noticeably thicker than a tortilla.
Don’t worry about making them perfectly round. Rustic charm is part of their appeal! If you see any cracks forming on the edges, just dip your finger in water and smooth them over. Place each finished gordita on a plate and keep them covered with a clean towel while you shape the rest.
Stage 3: Cooking to Golden Perfection
You have two fantastic options for cooking, depending on the texture you prefer.
- The Frying Method (For a Crispy Exterior): Heat ¼ cup of oil in a skillet over medium-high heat. When the oil is shimmering but not smoking, it’s ready. Carefully lay a few gorditas in the pan, making sure not to overcrowd it. Fry them for about 2 minutes on each side. You’re looking for a beautiful golden-brown color. Once cooked, place them on a paper towel-lined plate.
- The Griddle Method (For a Softer, Toasted Finish): This is my personal favorite. Heat your griddle over medium heat with just a tablespoon or two of oil. Cook the gorditas for about 2 minutes per side. They’ll get lovely toasted brown spots and should puff up slightly. That puff is a great sign! It means you’ve got a perfect little air pocket inside.
Once your gorditas are cooked and cool enough to handle, take a serrated knife and carefully cut along one edge to open up a pocket. Stop about halfway around.
Now for the best part—stuffing them!

Variations & Customization: Make Them Your Own!
This recipe is a canvas for your creativity. For a spicier dough, try mixing in a pinch of chili powder. For a richer flavor, use lard instead of oil.
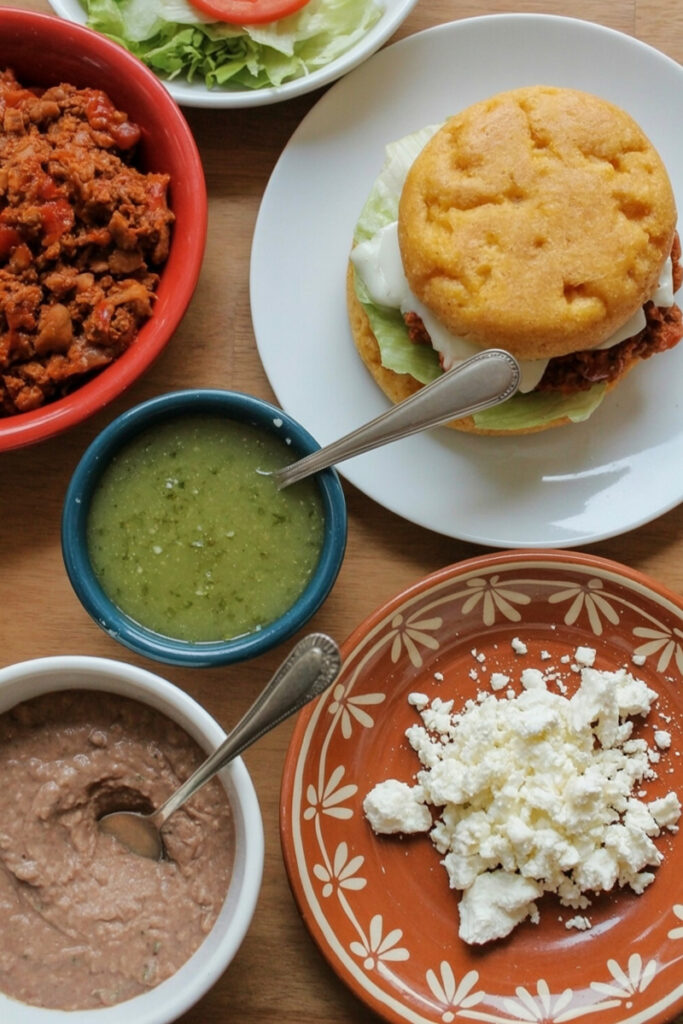
The real fun, however, comes with the fillings. You can go simple or get fancy. Some ideas:
- Refried beans, cheese, and salsa
- Slow-cooked carnitas or chicken tinga
- Spicy chorizo with potatoes
- Black beans, avocado, and grilled peppers
The good news? The masa shells are naturally gluten-free. To keep it vegan, simply stick with oil instead of lard and choose plant-based fillings.
Serving & Storage: Enjoying Your Creation
I love serving gorditas family-style.
Set up a “gordita bar!” Arrange the warm shells on a platter and set out bowls of different fillings and toppings—shredded lettuce, crumbled queso fresco, sour cream, pickled onions, fresh cilantro, and a variety of salsas. Everyone can build their own perfect bite.
If you have leftovers, store the unfilled shells in an airtight container in the refrigerator for up to 5 days. They also freeze beautifully for up to 3 months! Just stack them with parchment paper in between.
To reheat, warm them in a dry skillet or a toaster oven for a few minutes until heated through and slightly crisp again. Enjoy!