
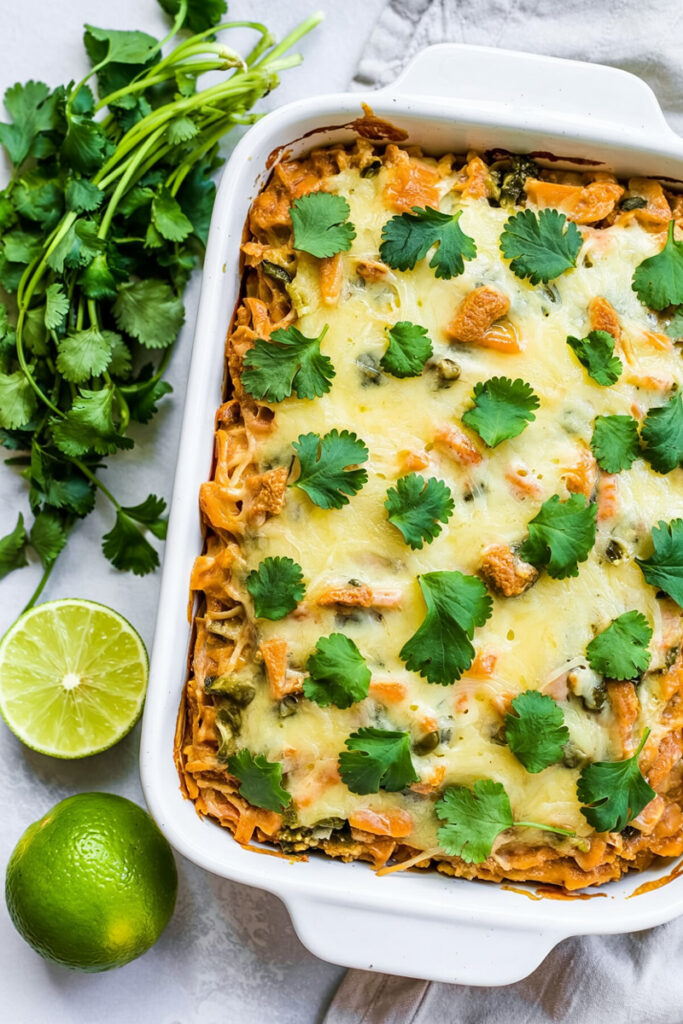
Hey there! So glad you’re here. Today, we’re making one of my absolute favorite comfort foods: a warm, cheesy, bubbly pan of green chile chicken enchiladas.
Honestly, is there anything better? Rolling up creamy chicken in a soft tortilla, smothering it in green sauce, and baking it until it’s golden and perfect. It’s like a hug in a casserole dish. I make this for my family on busy weeknights, for potlucks, and pretty much any time I need a guaranteed crowd-pleaser.
A little fun fact for you. This style of enchilada, with all the cream and cheese, is often called Enchiladas Suizas, or “Swiss Enchiladas.”1 The name comes from Swiss immigrants in Mexico who introduced all their amazing dairy and cheese-making skills.2 Pretty cool, right?
This recipe is my simplified version. It has all the soul of the traditional dish but is way easier to pull off on a Tuesday night. Let’s get into it.
Here’s a Quick Look at What We’re Doing
Don’t worry, this is super straightforward. We’re not spending all day in the kitchen. The goal is maximum flavor with minimal fuss.
Time Commitment: You’ll have this on the table in about 35 minutes. Seriously. It’s about 10 minutes of prep and 25 minutes in the oven.
How Much It Makes: This recipe makes 8 enchiladas, which is perfect for 4 people if everyone has two. Need more? Just double everything and use two baking dishes. Easy peasy.
Is It Hard to Make? Nope. This is a beginner-friendly recipe. If you can stir stuff in a pan, you can make these enchiladas. Using pre-cooked chicken and canned sauce is our secret weapon. It saves a ton of time.
What You’ll Need:
- A 9×13 baking dish (or something similar)
- A knife and cutting board
- A big skillet or sauté pan
Make-Ahead Tips: This is one of my favorite recipes to prep ahead of time. You can make the chicken filling a day or two early and just keep it in the fridge. You can even assemble the whole dish, cover it, and pop it in the fridge for up to 24 hours before you bake it. It’s a lifesaver for busy weeks.
| Scaling Guide | Servings | Baking Dish | Chicken | Enchilada Sauce | Cheese | Tortillas |
| Half Recipe | 2 | 8×8″ | 1.5 cups | ~1 cup (7.5 oz) | ¾ cup | 4 |
| Full Recipe | 4 | 9×13″ | 3 cups | 1 can (15 oz) | 1.5 cups | 8 |
| Double Recipe | 8 | Two 9×13″ | 6 cups | 2 cans (30 oz) | 3 cups | 16 |
The Ingredients List
The magic of this recipe is that it uses simple, easy-to-find ingredients to create something that tastes incredible.
Let’s talk chicken. You’ll need 3 cups of cooked, shredded chicken. My favorite trick? I grab a rotisserie chicken from the grocery store. It’s always moist and flavorful, and it saves me a whole cooking step. But leftover chicken works great, too!
For that creamy texture, we’ll use ¾ cup of sour cream. I really suggest using the full-fat kind. It makes the filling richer and won’t get weird and watery when you cook it.
You’ll also need one 4 oz can of diced green chiles. Don’t worry, these usually aren’t spicy. They just add a little tangy, zesty flavor that makes the filling pop.
And now, the star of the show: a 15 oz can of green enchilada sauce. This is different from a jar of salsa verde. Enchilada sauce is thinner and has a cooked, savory flavor that’s perfect for this dish. Grab your favorite brand—mild, medium, or hot is up to you.
Cheese time! We need 1½ cups of shredded Monterey Jack. It melts so well and has a great buttery flavor. A little pro-tip I learned a while back: grate your own cheese. Seriously. The pre-shredded stuff has powders on it to keep it from clumping, which means it doesn’t melt as smoothly. Grating it yourself from a block makes a huge difference.
Finally, the basics: one medium onion, two cloves of garlic, 8 tortillas (flour or corn both work great), and some fresh cilantro for sprinkling on top at the end.
Okay, Let’s Cook!
Ready? Grab your apron. Let’s do this.
Step 1: Get Your Pan and Oven Ready
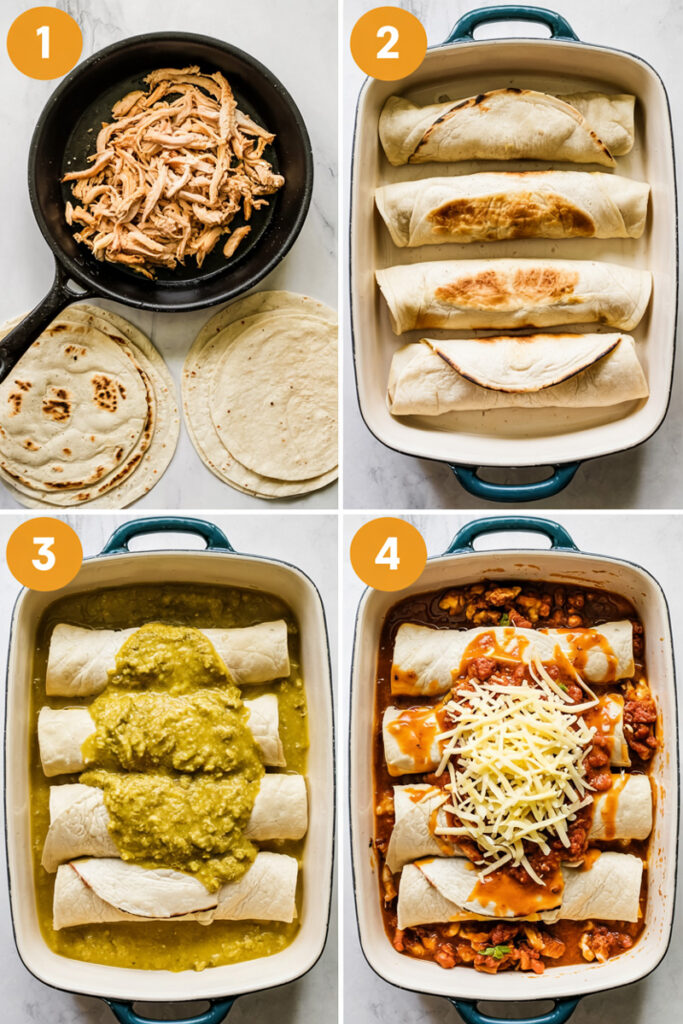
First, preheat your oven to 375°F. While that’s heating up, put a large skillet on the stove over medium heat and add a little olive oil. Once the oil is shimmering, toss in your diced onion. Cook it for 3-4 minutes, stirring a bit, until the onions get soft and translucent. You just want to cook out that raw bite.
Now, add the minced garlic. Pay attention here—garlic burns in a flash, and burnt garlic tastes bitter. It only needs about 30 seconds. As soon as you can smell that amazing garlic aroma, turn off the heat.
Step 2: Mix Up the Creamy Filling
The pan is still hot, which is perfect for this next part. With the heat off, add ¼ cup of the green enchilada sauce, the whole can of diced green chiles, all the shredded chicken, a ½ cup of your Monterey Jack cheese (save the rest for the top!), and the sour cream.
Stir everything together until it’s all combined into a creamy, delicious mess. Now’s a good time to taste it. Does it need a little salt or pepper? Go ahead and add it now.
Step 3: Set Up Your Assembly Line
This is the fun part. Get your station ready: the skillet with the chicken filling, your stack of tortillas, and your 9×13 baking dish. Pour a thin layer of the green enchilada sauce into the bottom of the baking dish and spread it around. Don’t skip this! It keeps the enchiladas from sticking and makes sure every bite is saucy.
Step 4: Fill ’em, Roll ’em, and Line ’em Up
Take a tortilla and spoon about ⅓ cup of the chicken filling down the middle. Don’t stuff it too full, or it’ll all squeeze out. Roll it up snugly and place it in the baking dish with the seam facing down. That’s the trick to keeping them from unrolling. Repeat until all your tortillas are filled and nestled in the dish.
Step 5: The Final Touch: Sauce, Cheese, and Bake!
Here we go. Pour the rest of the green enchilada sauce all over the tortillas. Make sure you get them covered from edge to edge. Then, sprinkle that remaining 1 cup of cheese all over the top. Be generous!
Slide the dish into your preheated oven and bake for about 20 minutes. You’ll know they’re done when the cheese is melted and bubbly and the sauce is bubbling around the edges.

Make It Your Own
The best part about a recipe like this is that you can totally tweak it to your liking. Here are a few ideas:
- Gluten-Free? Easy. Just use corn tortillas and make sure your enchilada sauce is labeled gluten-free.
- Want it Spicier? Go for it! You can add a diced jalapeño when you cook the onions, use a “hot” enchilada sauce, or sprinkle some cayenne pepper into the chicken filling. Using Pepper Jack cheese instead of Monterey Jack is also a great move.
- Feeling Fancy? If you’re making this for guests, you could garnish it with more than just cilantro. A sprinkle of cotija cheese, some thinly sliced radishes, a dollop of sour cream, or some pickled red onions would be amazing.
- Sneak in Some Veggies: This filling is great for hiding vegetables.3 In the summer, I’ll sometimes add roasted corn or zucchini. In the fall, some roasted sweet potato or butternut squash is delicious in the mix.
Serving and Storing Your Masterpiece
I know it’s hard, but let the enchiladas rest for 5-10 minutes after they come out of the oven. This helps them set up a bit so they don’t fall apart when you serve them. Then, sprinkle with fresh cilantro right before you dig in.
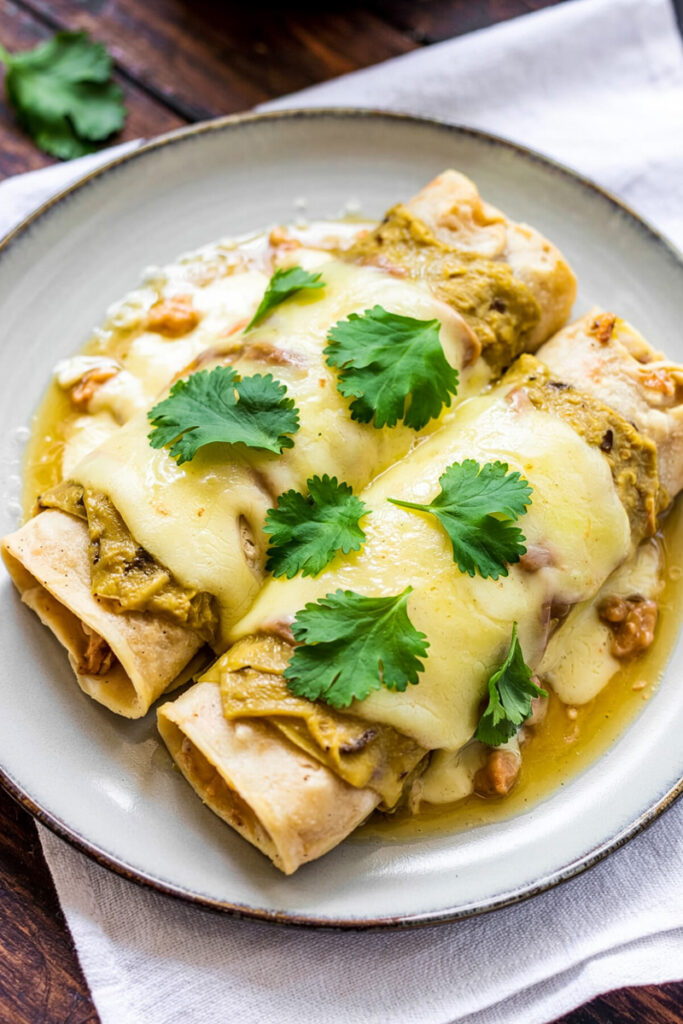
- What to Serve on the Side: I love serving these with Mexican rice and refried beans. A simple green salad with a lime dressing is also a great, fresh side.
- Storing Leftovers: Leftovers are amazing. Just put them in an airtight container in the fridge for up to 4 days. I think they’re best reheated in the oven at 350°F for about 15-20 minutes so the tortillas don’t get soggy. The microwave works if you’re in a hurry, though.
- How to Freeze Them: You can totally freeze these! Assemble the whole dish but don’t bake it. Cover it tightly with plastic wrap, then a layer of foil. Write the date and baking instructions on the foil. They’ll be good in the freezer for up to 3 months. When you’re ready to eat, you can bake them right from frozen. Take off the plastic wrap, cover it back up with the foil, and bake at 375°F for 40 minutes. Then, take the foil off and bake for another 15-20 minutes until they’re hot and bubbly.
Enjoy every single cheesy, saucy bite!