
Hey friends, welcome!
Let’s be real. Some nights you crave tacos. You want the seasoned meat, the melted cheese, all that good stuff. But then you think about the reality of it. Juggling all the little bowls of toppings, heating up individual shells, the inevitable mess… and suddenly, ordering a pizza sounds a lot easier.
I’ve been there so many times. That’s exactly how this recipe was born.
Think of this dish as a taco’s cozy, low-maintenance cousin. It’s got all the flavor of your favorite tacos packed into a simple, shareable casserole. This isn’t some traditional recipe from Mexico; it’s pure Tex-Mex comfort food, designed for busy weeknights and hungry families.
My big discovery for making this the best taco bake ever? A jar of salsa con queso. Seriously. I tried a bunch of versions, and stirring that cheesy salsa right into the meat was the trick. It makes the filling super creamy and rich, so every layer is just packed with flavor. This isn’t just a recipe; it’s my go-to for a guaranteed dinner win.
Here’s the Lowdown
Before we get our hands dirty, here’s a quick look at what we’re getting into. This recipe is designed to be easy, I promise. No weird steps or fancy skills needed.
Prep and Cook Time: You’ll spend about 15 minutes getting the beef cooked and the layers assembled. Then the oven takes over for 20 minutes. So, from start to finish, you’re looking at about 45 minutes total. Not bad, right?
Servings and Scaling: This recipe makes 6 solid servings. But you can easily change it up. Cooking for two? Or feeding a whole team? I’ve got you covered. This table makes it super simple.
| Servings | Ground Beef | Taco Seasoning | Salsa con Queso | Flour Tortillas (8-inch) | Shredded Cheese | Pan Size |
| 2-3 | ½ pound | ½ packet | ¼ cup | 2 | 1 cup | Loaf pan or 6-inch pan |
| 6 (Standard) | 1 pound | 1 packet | ½ cup | 3 | 2 cups | 8-inch round or square |
| 10-12 | 2 pounds | 2 packets | 1 cup | 5-6 | 4 cups | 9×13 inch baking dish |
Difficulty Level: Total beginner. If you can brown ground beef in a pan, you can absolutely nail this dish.
What You’ll Need: You probably have most of this stuff in your kitchen already.
- A large skillet: For cooking the beef.
- A spatula: For breaking up the meat.
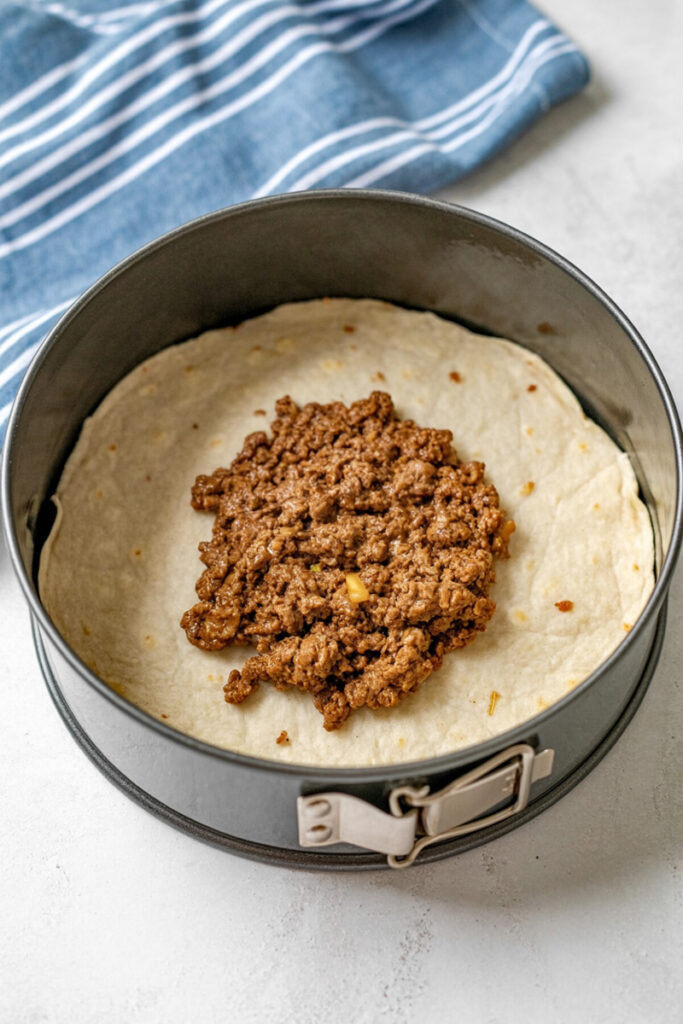
- An 8-inch round baking pan: A square one works great, too. A little secret? If you want those super clean, pretty slices you see in photos, use an 8-inch springform pan (the kind for cheesecake). It works like a charm!
Want to Make it Ahead? Yes! You can cook the beef filling up to 3 days ahead of time. Just keep it in a sealed container in the fridge. When you’re ready to eat, just assemble and bake!
The Heart of the Dish: Your Ingredients
The best part about this recipe is how simple the ingredient list is. We’re using everyday stuff to make something really delicious.
Let’s break it down.
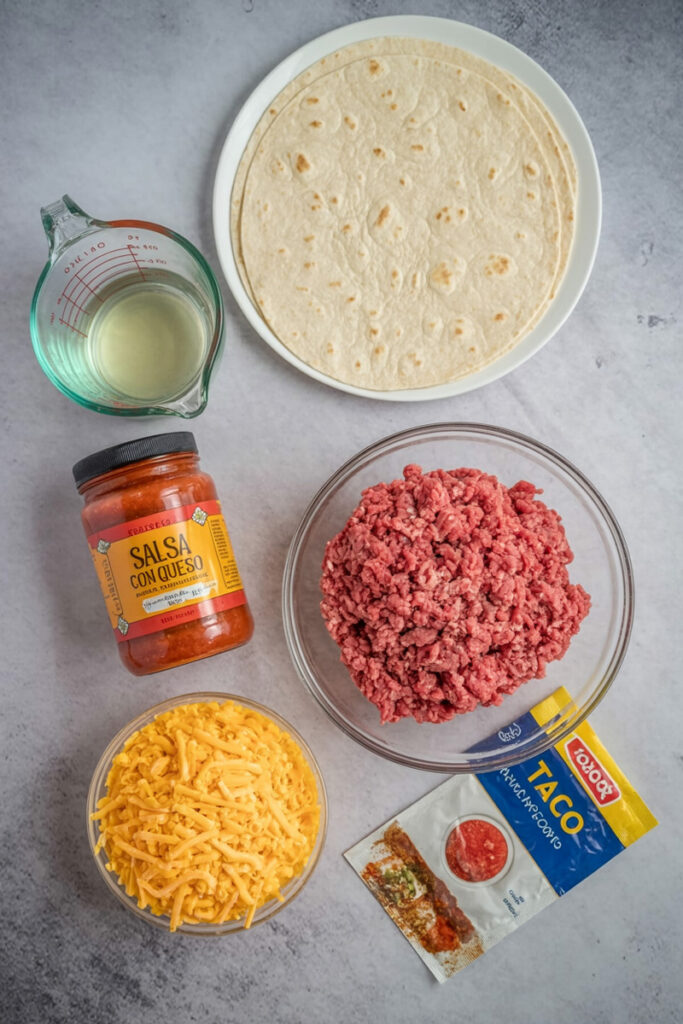
For the ground beef, I like using an 80/20 blend. That little bit of extra fat adds a ton of flavor. Don’t worry, we drain most of it off anyway. If you want something leaner, 90/10 beef, ground turkey, or even ground chicken are all great options.
The taco seasoning is where the classic flavor comes from. A standard 1-ounce packet does the job perfectly. If you have a homemade blend you love, go for it!
Now for the magic ingredient: salsa con queso. This is the creamy, cheesy dip you find in a jar right next to the regular salsa. It melts into the meat and creates this amazing, velvety sauce that holds everything together.
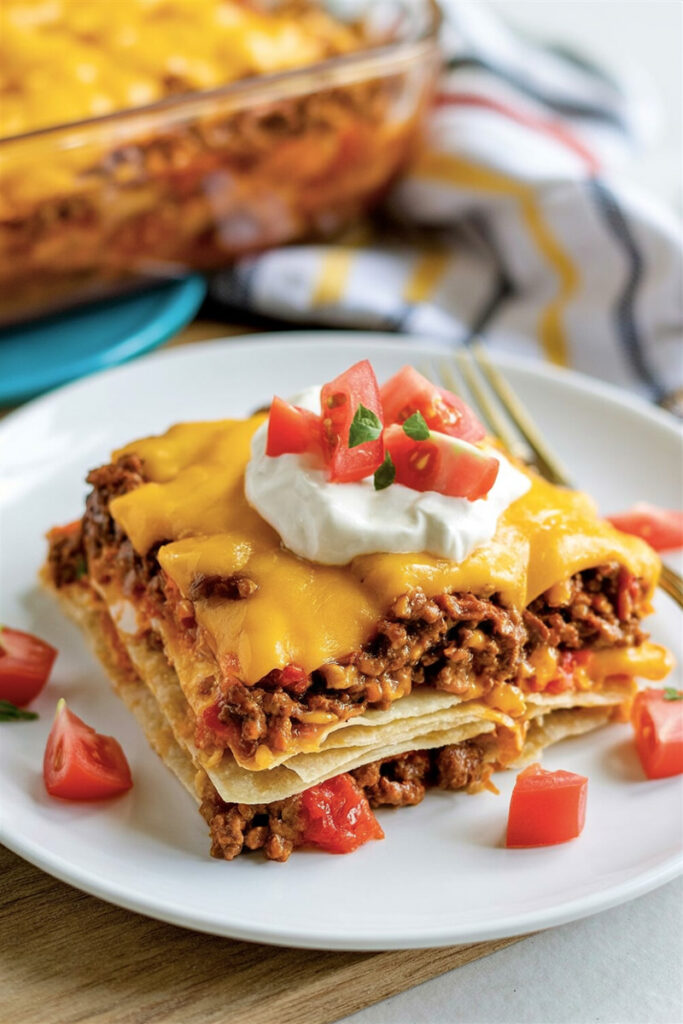
For the layers, you’ll need three 8-inch “soft taco” flour tortillas. As they bake, they get super soft, kind of like noodles in a lasagna.
And finally, the cheese. A bag of pre-shredded Mexican cheese blend is the easy button, and it works great. But here’s my personal plea. If you have an extra five minutes, please shred your own cheese from a block. It melts so much better and gooey-er. It really does make a difference!
Step-by-Step: Let’s Get Cooking!
Okay, time for the fun part. Let’s walk through this step-by-step.
1. Make that Awesome Filling
First things first, let’s get that flavor going. Get your skillet over medium-high heat. Once it’s nice and hot, add the ground beef. Use your spatula to break it up into small crumbles.
Pro Tip: Don’t stir the meat constantly. Let it sit for a minute or two between stirs. This lets it get a nice brown crust on the bottom. That’s not burnt stuff; that’s pure flavor.
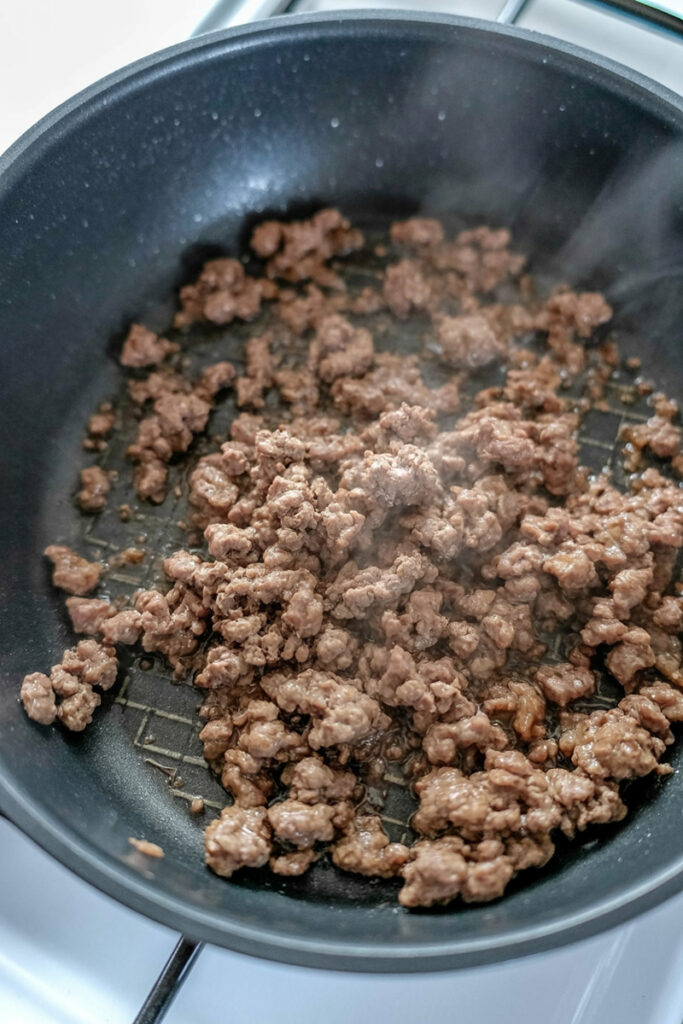
Once the beef is all browned with no pink left, carefully tip the pan and spoon off the extra grease. Skipping this will make your final dish greasy, so don’t forget!
Now, turn the heat down to medium. Sprinkle in the whole packet of taco seasoning and a bit of water. Give it a good stir and let it simmer for a couple of minutes. Your kitchen is about to start smelling amazing. The sauce will thicken up and coat every little piece of meat.
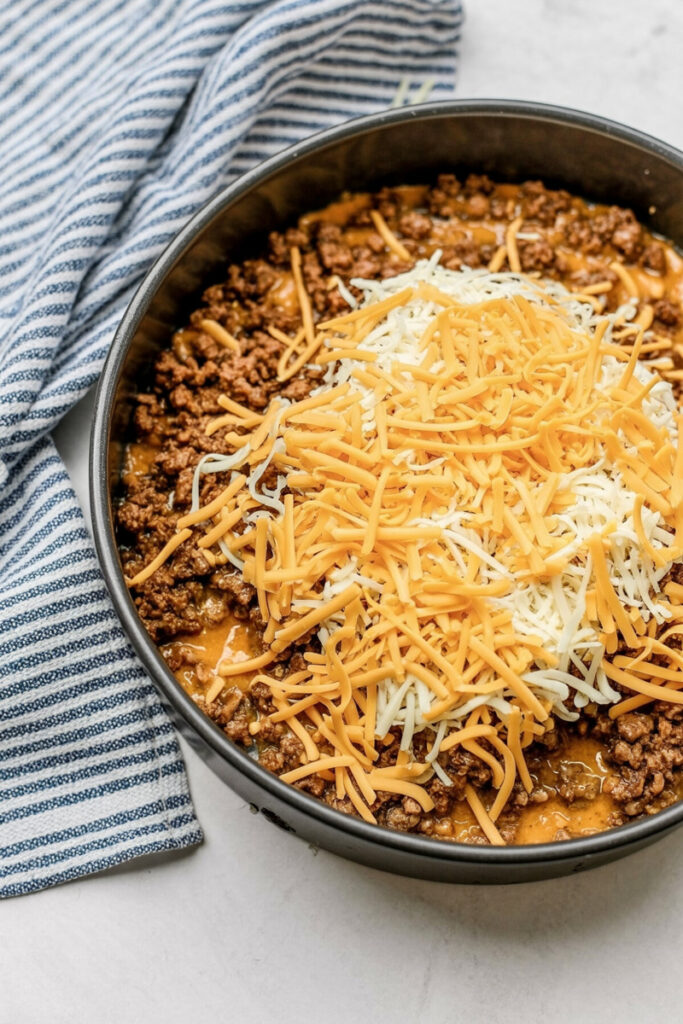
Turn off the heat. Now, stir in your secret weapon—the salsa con queso. Just watch as it melts right in, making the filling unbelievably creamy and rich.
2. Time to Build Your Bake
Get your oven preheating to 350°F. Give your 8-inch pan a quick spray with nonstick spray.
Now we layer! It’s just like making a lasagna, but way easier.
- Layer 1: Put your first tortilla in the bottom of the pan. Spoon about a third of the meat mixture on top and spread it out to the edges. Sprinkle a third of your cheese over the meat.
- Layer 2: Add the second tortilla. Top it with another third of the meat and another third of the cheese.
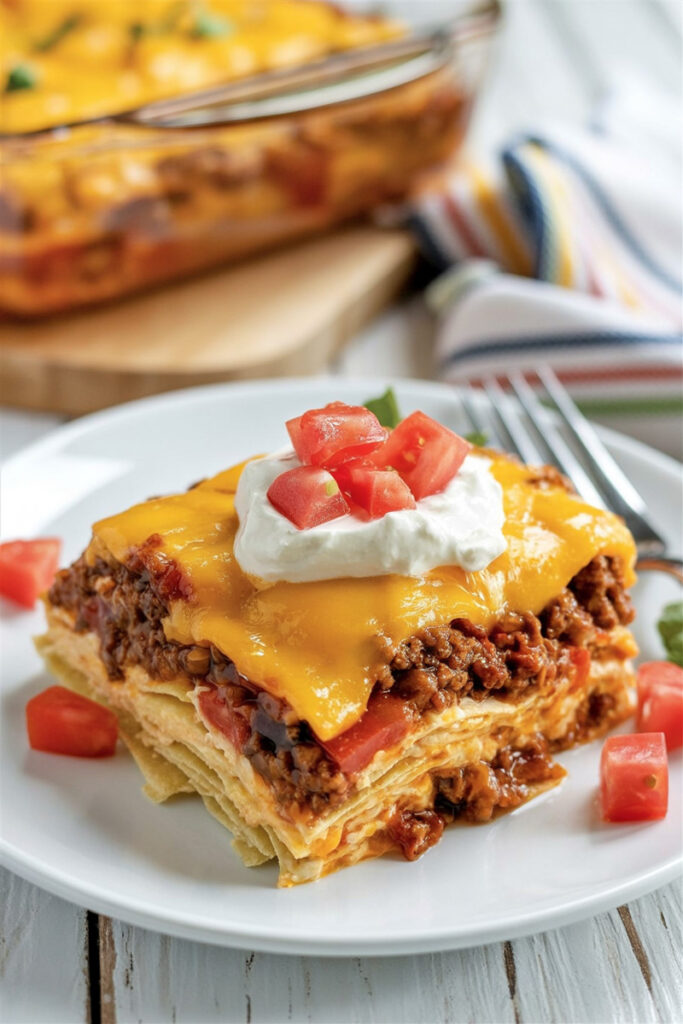
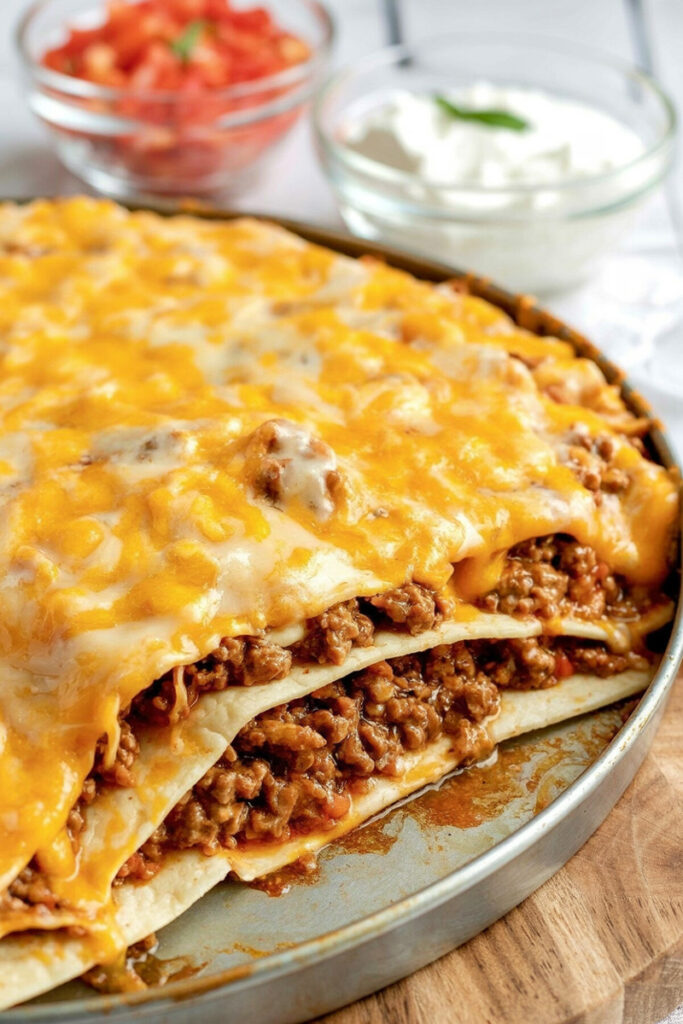
- Layer 3: Finish with the last tortilla, the rest of the meat, and a big, beautiful layer of the remaining cheese on top. You want a thick blanket of cheese to get that perfect golden, bubbly crust.
3. Bake it to Perfection
Pop that pan into the oven and bake for 15-20 minutes. You’re not really “cooking” it anymore, just getting everything hot and melting that cheese into a glorious, bubbly topping. You’ll know it’s done when the cheese is fully melted and the edges are just starting to turn golden brown.
Once you pull it out of the oven, here comes the hardest part. You have to let it rest for at least 5 minutes before you cut into it. I know, it’s torture. But trust me on this! This gives the layers a chance to set up. If you cut it right away, you’ll have a delicious, sloppy pile. A little patience now means you’ll get those perfect, clean slices.
Variations: Make It Your Own!
This recipe is a great starting point. Feel free to play around and customize it!
- Gluten-Free? Easy. Just use corn tortillas instead of flour, and double-check that your taco seasoning is certified gluten-free.
- Want a Veggie Version? Swap the ground beef for a plant-based crumble. To make it extra hearty, add a can of rinsed black beans or pinto beans to the filling.
- Like it Spicy? Use a hot salsa con queso, add a pinch of cayenne to the meat, or throw in a layer of pickled jalapeños. For a kid-friendly version, just stick with mild everything.
- Feeling Fancy? Spread a layer of refried beans on the bottom tortilla before adding the meat. Or, mix a cup of corn into the meat filling. Sautéing some diced onions and peppers with the beef is also a great way to add more flavor.
Serving and Storing Your Creation
It’s time to eat! Use a sharp knife and cut the bake into wedges, like a pie. I love to serve it with a big dollop of sour cream, some shredded lettuce, and diced tomatoes on top.
It’s great with a side of Mexican rice or some seasoned black beans.
Got leftovers? They’re amazing.
Storage: Keep any leftovers in an airtight container in the fridge for up to 4 days.
Reheating: The best way to reheat it is in a toaster oven or a regular oven at 350°F for about 10 minutes. This helps the edges get a little crispy again. The microwave works fine too, but it will be a bit softer.
Freezing: This taco bake freezes beautifully. You can assemble the whole thing, cover it tightly with plastic wrap and foil, and freeze it for up to 3 months. Bake it straight from the freezer; just add an extra 20-30 minutes to the baking time.
I really hope you enjoy making—and eating—this dish as much as my family and I do. Enjoy!