")
If you grew up near a Mexican bakery (or panadería), you know the smell.
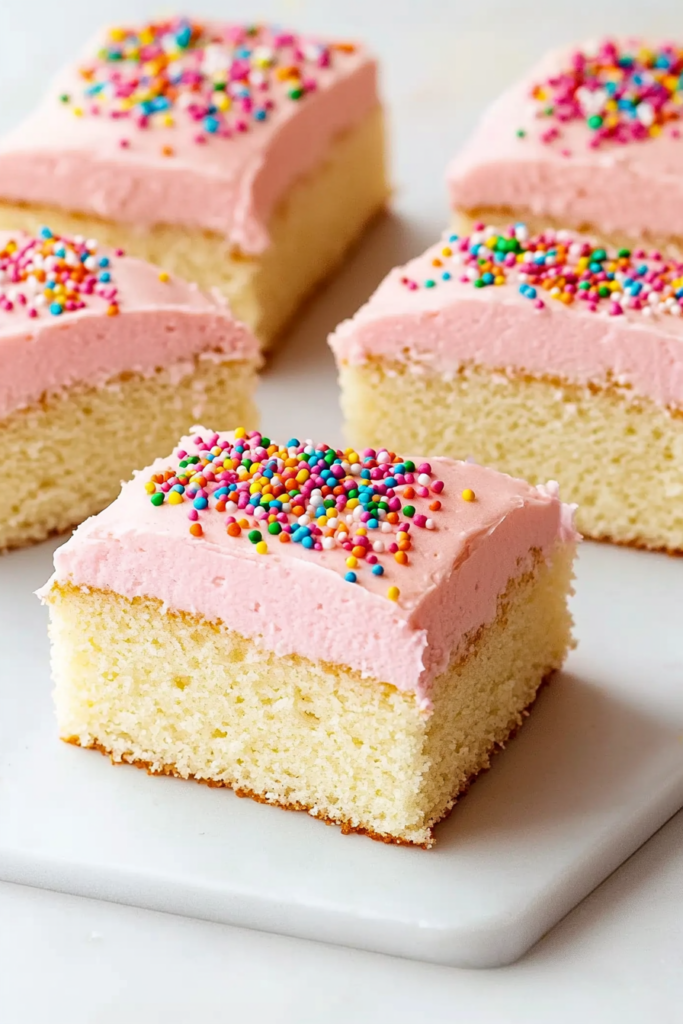
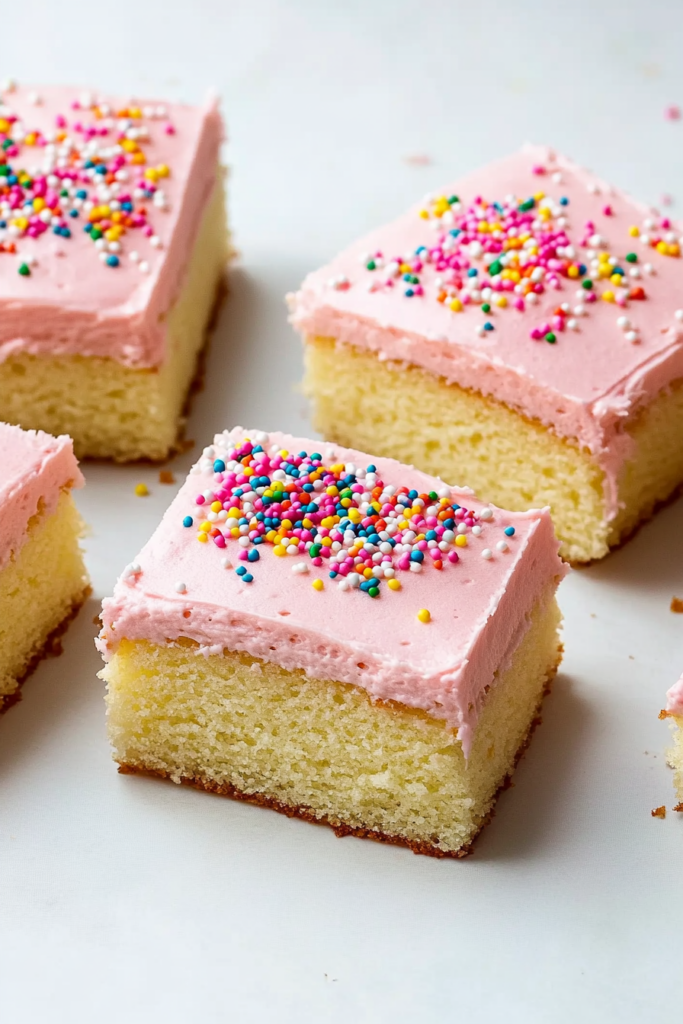
Sugar. Yeast. Warmth. And you definitely know the “Pink Cake.”
It sits there bright and happy next to the golden sweet breads. We call it Cortadillo. Sometimes it’s called Pastel de Niños (Kids’ Cake). Whatever you call it? It’s a childhood icon.
The bakery version is usually pretty dense. It has to be. It sits in a display case all day waiting to be dunked in hot coffee. But we’re baking at home today. So I made a few tweaks. We’re keeping the bright pink look. We’re keeping that famous almond-vanilla taste. But the texture?
It’s getting a makeover. We’re ditching the dry crumb for something soft. Tender. The kind of cake that melts in your mouth.
You don’t have to dip this one in milk. But I won’t judge you if you do.
Recipe Overview
This cake is very doable, even on a busy day. From start to finish, it takes under two hours, and a lot of that time is just baking and cooling. The actual hands-on work? Much less. Perfect for a relaxed weekend… or a last-minute plan.
It bakes in a 13×9-inch pan and makes about twelve good-sized squares. Need more? Double it. Feeding fewer people? Cut it in half. This recipe is flexible, which makes it forgiving—and I love that.
Difficulty-wise, this is beginner-friendly. There’s nothing tricky going on. You just need to pay attention to the order of mixing and watch the textures as you go. No fancy tools required. A hand mixer works just fine. In fact, that’s how this cake has been made in home kitchens for years.
One more bonus.
This cake is great for planning ahead.
You can bake it a day early and frost it later. You can even freeze the unfrosted cake. That makes Cortadillo a solid choice when you want something reliable and stress-free.
The Game Plan
You might think bakery-style cakes are a hassle.
The good news? This one is actually pretty chill.
- Prep time: 25 minutes.
- Total time: About 2 hours (mostly cooling time).
- Servings: 12 big squares.
I’d rate this as easy-medium. You don’t need fancy tools. A hand mixer and a 13×9 pan work perfectly.
My favorite thing about this recipe:
It tastes better the next day.
Seriously. Because we use oil instead of just butter, it stays moist on the counter. So you can bake it tonight and be the hero of the potluck tomorrow.
What You Need
Don’t worry about buying expensive ingredients. You probably have most of this stuff right now.
For the Cake:
- Flour: I use Gold Medal All-Purpose, but store brand is fine.
- Baking Powder & Salt: The lifters and the flavor balancers.
- Eggs: You need 5 large ones. Yes, 5. They build the structure.
- Sugar: Good old white granulated sugar.
- Oil & Milk: The moisture team. Oil keeps it soft; milk makes it rich.
- Vanilla: Use a lot. We want flavor.
For the Frosting:
- Butter: Unsalted is best so you control the saltiness.
- Powdered Sugar: The base of our fluff.
- Heavy Cream: To thin it out.
- The “Secret” Flavor: Almond extract. Just a teaspoon. This is what makes it taste like a real Mexican bakery cake.
- Pink Gel Color: Gel works better than liquid drops. It keeps the frosting thick.
- Rainbow Nonpareils: These are the little round balls. Not the long sprinkles.
Ingredients, Explained Gently
At first glance, the ingredients are simple. Pantry staples. Nothing unusual. But how you treat them makes all the difference.
All-purpose flour gives the cake structure, so measuring it correctly matters more than the brand. Baking powder helps the cake rise evenly, and salt keeps the sweetness from feeling flat. If you’re using fine salt instead of kosher, just use a little less.
Eggs are key here. Letting them come to room temperature helps them whip better with the sugar. That step creates air. Air equals softness. You’ll actually see the change as the mixture turns pale and foamy.
Sugar dissolves into the eggs and builds structure. Oil keeps the cake moist long after it cools—this is why cortadillo still tastes good the next day. Whole milk adds richness, but lower-fat milk will work if that’s what you have. Vanilla is the main flavor, so using a decent one really shows.
The frosting is classic bakery-style. Soft butter gives it body. Powdered sugar brings sweetness. Heavy cream makes it fluffy and smooth. Vanilla and almond extract together create that familiar panadería smell. The almond should stay subtle. Just enough to notice.
Pink gel food coloring gives strong color without thinning the frosting. And the sprinkles? They’re not just decoration. They’re part of the experience.
Let’s Get Baking
Step 1: The Setup
Turn your oven to 350°F. You want it hot before the cake goes in.
Grease your 13×9 pan. I like to line it with parchment paper too. It makes lifting the cake out later way easier.
Step 2: The “Ribbon” Trick
This is the most important part.
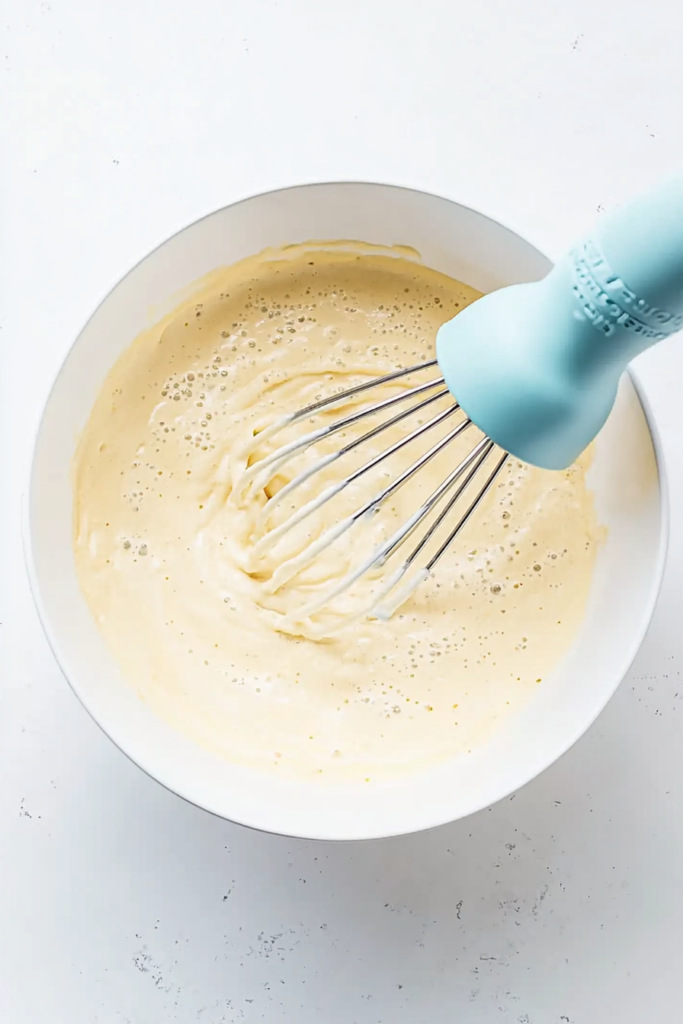
Crack your eggs into a big bowl. Dump in the sugar.
Now, beat them. High speed.
Don’t just mix them. You need to beat them for a full 1 to 2 minutes.
The color will change. It will go from orange to pale yellow. It will get fluffy.
The test: Lift your beaters up. The batter should fall back down in a thick ribbon that sits on top for a second.
This foam is what makes the cake light.
Step 3: Gentle Mixing
Turn the mixer down to low.
We need to add the flour and the liquid (milk/oil/vanilla).
But here is the catch: Don’t crush your foam.
- Add a little flour. Mix gently.
- Add some liquid. Mix gently.
- Repeat until it’s all in there.
Stop mixing the second the white flour disappears. If you over-mix, you get a chewy cake. We want a fluffy cake.
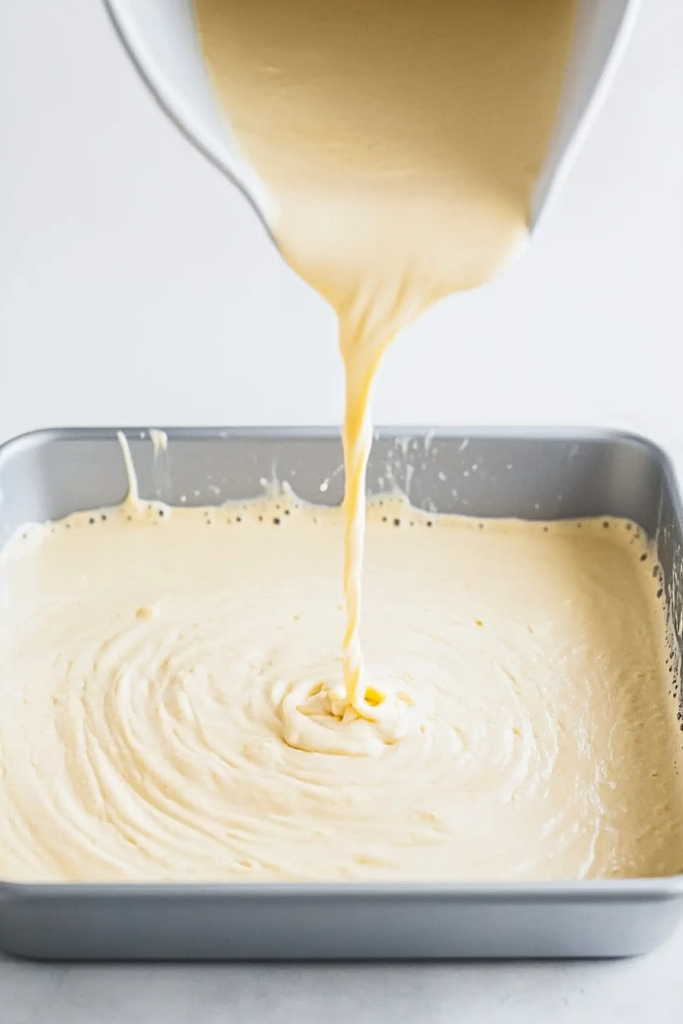
Step 4: The Bake
Pour the batter into the pan.
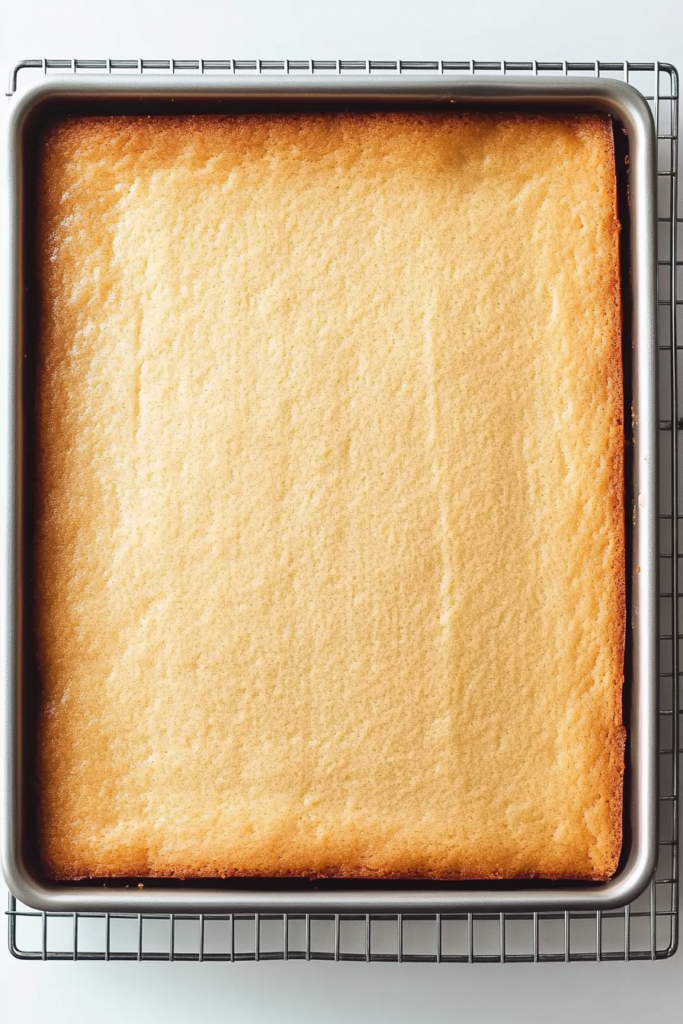
Bake for 25 to 30 minutes.
How do you know it’s done?
- It’s golden brown.
- Press the center gently with your finger. It should spring back. If it leaves a dent, it needs more time.
Important: Let it cool completely. If you frost a warm cake, the butter melts. Then you have pink soup. Nobody wants pink soup.
The Fun Part: Frosting
Once the cake is cool, grab your butter.
Beat it until it looks creamy. Slowly add the powdered sugar, cream, and extracts.
Whip it on high for 2 minutes. Make it fluffy like a cloud.
Then, add the pink dye. Start small. You can always add more, but you can’t take it out. We want “Bubblegum Pink.”
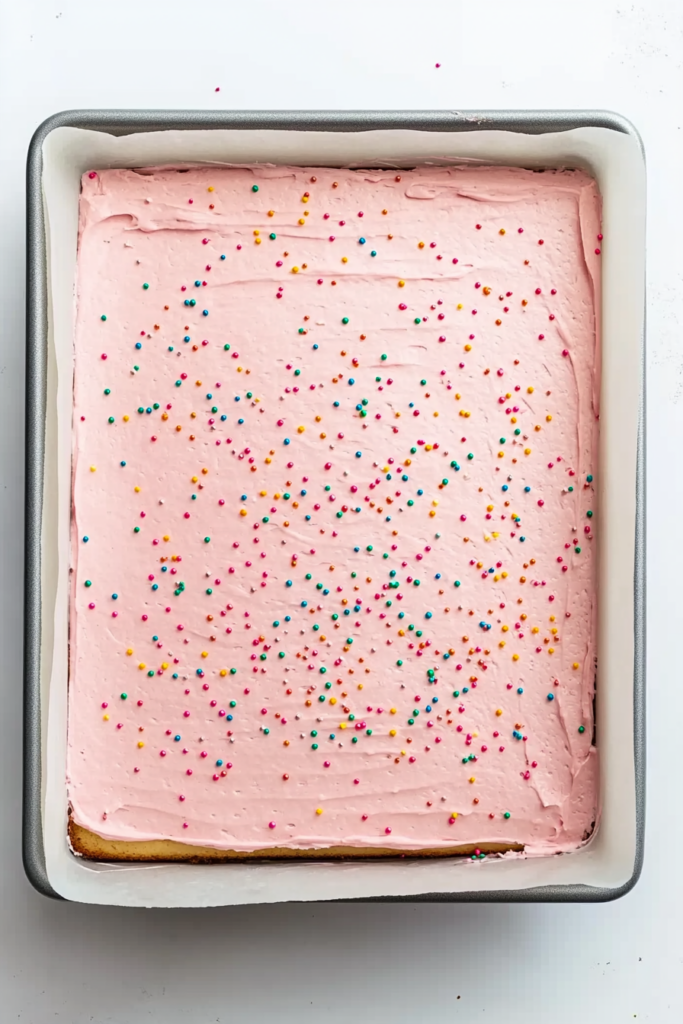
Smear it all over the cake.
Don’t worry about making it smooth. Why?
Because we are going to cover it in sprinkles. Shake those rainbow balls all over the top while the frosting is sticky.
Variations & Customization
This cake adapts easily.
Gluten-free flour blends work well if you use a 1:1 substitute. Vegan versions take more experimenting, but aquafaba can replace eggs, and plant-based dairy works surprisingly well.
Want to dress it up? Spread a thin layer of strawberry or guava jam under the frosting. Want to keep it simple? Skip the almond and stick with vanilla.
You can even change the look with the seasons. Softer pinks in spring. Brighter shades for parties. Coconut or chopped nuts instead of sprinkles if you want something different.
Make It Yours
Cooking isn’t a science exam. You can mess around with this.
Want it strictly traditional? Slice the whole cake in half horizontally (like a giant sandwich). Spread strawberry jam in the middle. Put the top back on. Frost. The jam adds a nice tang.
Dairy-Free? Easy. Use oat milk in the cake. Use a vegan butter stick for the frosting. It works perfectly.
Gluten-Free? Use a “Measure-for-Measure” GF flour. The eggs and oil hold this cake together really well, so it won’t crumble apart on you.
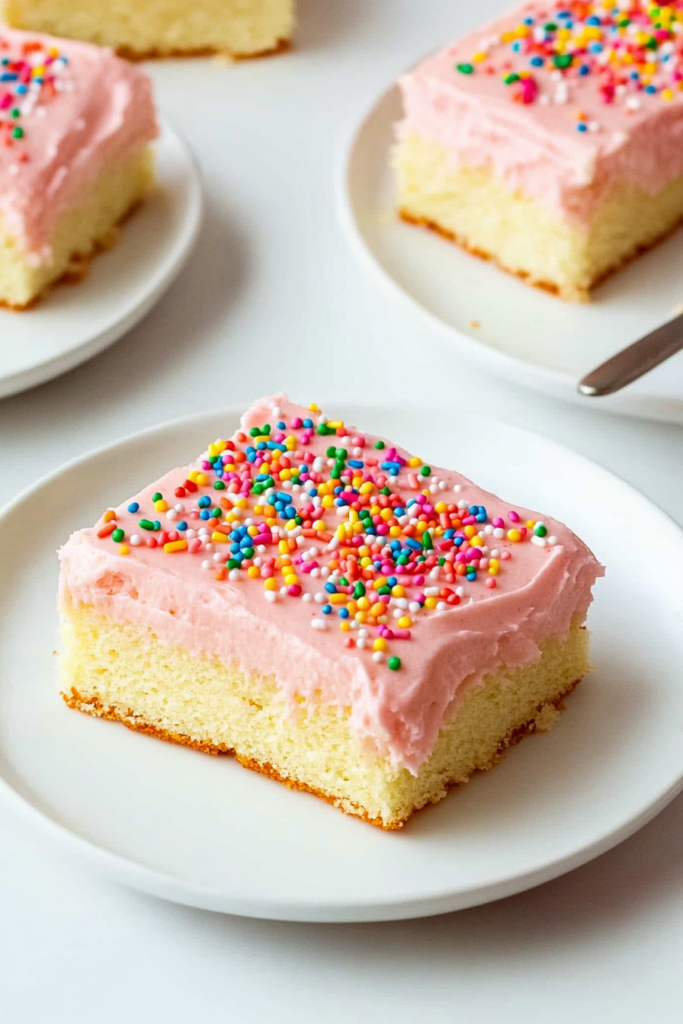
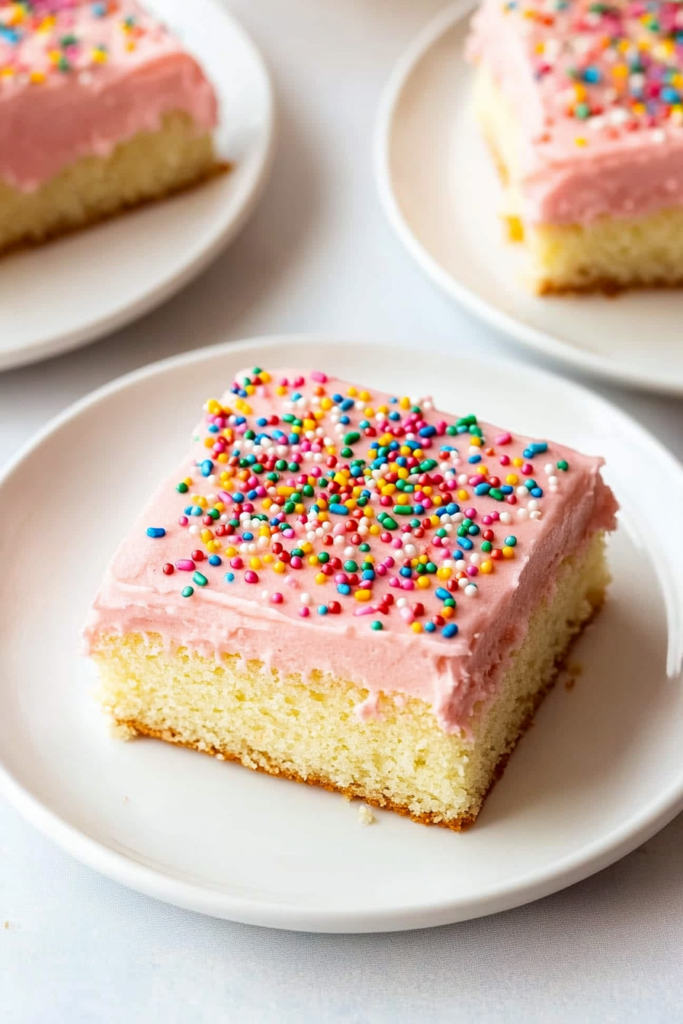
Serving Tips
When I cut this cake, I keep a warm, damp cloth nearby.
I wipe the knife between every cut. That’s how you get those sharp, clean edges that look good on Instagram.
Serve it with a glass of cold milk. Or, if you want the full experience, a hot cup of coffee.
Storage: Just keep it on the counter in a sealed container. It stays fresh for about 3 days.
You can also freeze slices. Wrap them in plastic wrap and toss them in a lunchbox. By lunchtime, they’re thawed and ready to eat.
PrintMexican Pink Cake Recipe (Pan Dulce Cortadillo)

This cake is very doable, even on a busy day. From start to finish, it takes under two hours, and a lot of that time is just baking and cooling. The actual hands-on work? Much less. Perfect for a relaxed weekend… or a last-minute plan.
It bakes in a 13×9-inch pan and makes about twelve good-sized squares. Need more? Double it. Feeding fewer people? Cut it in half. This recipe is flexible, which makes it forgiving—and I love that.
Difficulty-wise, this is beginner-friendly. There’s nothing tricky going on. You just need to pay attention to the order of mixing and watch the textures as you go. No fancy tools required. A hand mixer works just fine. In fact, that’s how this cake has been made in home kitchens for years.
One more bonus.
This cake is great for planning ahead.
You can bake it a day early and frost it later. You can even freeze the unfrosted cake. That makes cortadillo a solid choice when you want something reliable and stress-free.
- Prep Time: 25 min
- Total Time: 1 hr 55 min
- Yield: 12
- Category: Dessert
- Cuisine: Mexican
Ingredients
For the Cake:
-
Flour: I use Gold Medal All-Purpose, but store brand is fine.
-
Baking Powder & Salt: The lifters and the flavor balancers.
-
Eggs: You need 5 large ones. Yes, 5. They build the structure.
-
Sugar: Good old white granulated sugar.
-
Oil & Milk: The moisture team. Oil keeps it soft; milk makes it rich.
-
Vanilla: Use a lot. We want flavor.
For the Frosting:
-
Butter: Unsalted is best so you control the saltiness.
-
Powdered Sugar: The base of our fluff.
-
Heavy Cream: To thin it out.
-
The “Secret” Flavor: Almond extract. Just a teaspoon. This is what makes it taste like a real Mexican bakery cake.
-
Pink Gel Color: Gel works better than liquid drops. It keeps the frosting thick.
-
Rainbow Nonpareils: These are the little round balls. Not the long sprinkles.
Instructions
Step 1: The Setup
Turn your oven to 350°F. You want it hot before the cake goes in.
Grease your 13×9 pan. I like to line it with parchment paper too. It makes lifting the cake out later way easier.
Step 2: The “Ribbon” Trick
This is the most important part.
Crack your eggs into a big bowl. Dump in the sugar.
Now, beat them. High speed.
Don’t just mix them. You need to beat them for a full 1 to 2 minutes.
The color will change. It will go from orange to pale yellow. It will get fluffy.
The test: Lift your beaters up. The batter should fall back down in a thick ribbon that sits on top for a second.
This foam is what makes the cake light.
Step 3: Gentle Mixing
Turn the mixer down to low.
We need to add the flour and the liquid (milk/oil/vanilla).
But here is the catch: Don’t crush your foam.
-
Add a little flour. Mix gently.
-
Add some liquid. Mix gently.
-
Repeat until it’s all in there.
Stop mixing the second the white flour disappears. If you over-mix, you get a chewy cake. We want a fluffy cake.
Step 4: The Bake
Pour the batter into the pan.
Bake for 25 to 30 minutes.
How do you know it’s done?
-
It’s golden brown.
-
Press the center gently with your finger. It should spring back. If it leaves a dent, it needs more time.
Notes
Make It Yours
Cooking isn’t a science exam. You can mess around with this.
Want it strictly traditional? Slice the whole cake in half horizontally (like a giant sandwich). Spread strawberry jam in the middle. Put the top back on. Frost. The jam adds a nice tang.
Dairy-Free? Easy. Use oat milk in the cake. Use a vegan butter stick for the frosting. It works perfectly.
Gluten-Free? Use a “Measure-for-Measure” GF flour. The eggs and oil hold this cake together really well, so it won’t crumble apart on you.
Serving Tips
When I cut this cake, I keep a warm, damp cloth nearby.
I wipe the knife between every cut. That’s how you get those sharp, clean edges that look good on Instagram.
Serve it with a glass of cold milk. Or, if you want the full experience, a hot cup of coffee.
Storage: Just keep it on the counter in a sealed container. It stays fresh for about 3 days.
You can also freeze slices. Wrap them in plastic wrap and toss them in a lunchbox. By lunchtime, they’re thawed and ready to eat.